title description

A place for busy people to find inspiration, nurture their creative spirit, & CREATE the life they want to live. Make a date to CREATE today!

Labels

art (1) Balance (4) chalkboard paint (2) dessert (1) dinner (1) DIY (9) fabric (1) family (2) food (3) garden (1) gift (2) Gratitude (4) Green (1) Green Being (2) jewelry (1) kids (6) make-believe (1) nature (1) organize (3) party (1) positive (1) running (7) sewing (6) window pane (1) wood (2)

7.26.2011

Loving-Kindness Jar

So those of you who know anything about children know that the early years can pose their own challenges, specifically naughty behavior. Time-outs sometimes feel like they are eating up the days! 
So, to help all of us recognize, acknowledge, & really appreciate each other's positive behaviors we started the "Loving-Kindness Jar".
It's easy & can be used by even the busiest of families!

This jar is almost full to the top!

How it works:
Specifically at dinner (especially during the work week) but it can be at any point during the day, we catch each other showing loving-kindness.  

First, keep all the marbles in a separate container. 

While the jar is empty, decide, as a family, on a special treat for the family (i.e. family movie night, trip to the beach, game night, hike, pool party, etc.). We try to make it something that we can do together as a family as opposed to a material item. Write this on a small piece of paper & place on the bottom of the jar.

Next, whenever we (kids & adults) see someone from our little family unit showing loving-kindness we put a marble in the jar.
{The rule is that you can't ask someone to put a marble in for you.}

Each night at dinner (at least) when you're chatting about your day ask if anyone saw someone in the family showing loving-kindness.  We started by really modeling the recognition, making sure to say something about each other as well as the kids (i.e. "I love how Dad made such a delicious dinner," "It was so nice how (child's name) helped you pick up your toys even though she didn't play with them." "(child's name) used such nice manners when she needed another drink.", etc). Try to recognize anything & everything, especially in the beginning. You're really teaching them how to notice positive behavior as well as what you expect & recognize as positive behavior. 
Be prepared for smiles & lots of recognition as the kiddos learn to love giving compliments to others. They also love hearing how others have noticed them throughout the day! When it really takes off you'll have children who are noticing positive behavior all around them throughout the day!
(Get your tissue ready b/c it's really sweet & you'll have tears of joy in your eyes)

Here comes the additional fun part, once the jar is filled up (after a few days, or weeks depending on how things are going & how big your jar is) empty all the marbles back out.  The little note you placed at the bottom will fall out & you'll be reminded of the family treat you have earned together! 
Put it on the calendar right away (so it doesn't slip away from you - not that you would forget or anything) & write a new treat on a piece of paper to place at the bottom of the newly empty jar  & the positive fun starts all over again!

Examples of behavior to recognize:
* cooking dinner
* using kind words
* helping around the house
* sharing
* taking care of the Earth
* helping without being asked
* helping someone feel better when they are sad
* ... endless possibilities! Just think about what is positive to you & what kind of behavior you wish to see more of in your own children.

I'd love to hear how it goes if any of you try this out at your house!

Half-Marathon - Here I Come

It's official... I finally registered for my first half-marathon!
Now to the training - I need to start taking it a bit more seriously.
68 days until race day!!!
Yikes!

Here's this week's training schedule:
Monday: Rest (not a bad way to start the week)
Tuesday: 3 mile easy run
Wednesday: Rest
Thursday: 5 mile tempo run (1mi. warm up, 3mi. @ 11:48, 1mi. cool down) 
Did I forget to mention I'm not a very fast runner? ... yet
Friday: 2 mile easy run
Saturday: Rest
Sunday: 8 mile long run (you bet your a** that's a long run!)
Here's the app I am using to help me with my training plan. It's the Runner's World - Smart Coach app. The picture shows it displaying the weekly plan. You can also view it in a daily view.

CREATE the healthy life you want!!!

Sewing Project #2 - cute little bag

Inspired by Amanda Blake Soule in her book, Handmade Home: Simple Ways to Repurpose Old Materials into New Family Treasures, I chose her pattern for the "Treasure Bag".

Gathering my materials
After cutting several strips of muslin 2"x5", I used the stamps to measure out the space.
To prevent the stamp from getting all goopy with fabric paint, instead of painting the paint directly onto the stamp I decided to use a small paint brush to brush on a small layer of fabric paint onto a plastic lid. 
This allowed a reasonable amount of paint to sit on the stamp.

You can see how clearly the letters came out
I couldn't resist making a few more. I had a feeling I was going to love this little project & want to make more than just one bag.
I just love burlap, don't you? 
I couldn't resist making my first little bag out of it.  Somewhere I had read about a great way to help cut a straight line out of burlap (If I find the link I will post it). 
You find one string of the burlap & pull it out. This will leave a straight line to cut along.
I'll admit, it was a little more of a project than I expected (it doesn't just pull right out), but look at the amazing results! 
A very straight line indeed!
A straight line is created by pulling a thread from the burlap.
I sewed the "read" stamped fabric to a piece of 7"x7" scrap fabric.
Then I sewed this piece to the burlap, folded it - right sides together, & sewed the sides of the burlap.
After turning it right side out again, I added bias tape to the top with a zig-zag stitch.
A couple things here, (1) I have never used bias tape, (2) tricky, hmmm..., (3) I didn't measure correctly so I ended up with a inch on the back of the bag with no bias tape, (4) next time I cut the bias tape only after I was finished adding it :) Much better results!
I used ribbon for the handle. You can see how amateur my zig-zag is - there is no denying that this is a handmade product!
Voila! I love it, my kids love it, and we are all so proud of mama! I love that they got to see their mom through the whole process of setting a goal, getting an idea, learning, & creating a finished product/project!
{f.y.i. - Nearly everyday since I finished this they've been talking about their own "projects", what they are creating next, and the types of materials they need. Love it!}
Onto the next bag! I am making 2 bags out of window screening (Amanda Blake Soule's idea).
Stitching on the stamped muslin piece
Checking the placement of the fabric square prior to stitching it all up


Stitching the fabric to the front of the screen

Here are the finished products! 
On the left we have a bag that will be used to carry our books back & forth to the library. 
On the right we have gift bags.
The "create" bag was filled with artsy-craftsy supplies.
The "play" bag was filled with trucks for the sand box. My hope is that the screen will allow for sand to easily shake out.

7.25.2011

Sewing Project #1

I've begun my practice! I've got my manual & I have some scrap fabric.

Project #1: Learn how to do some basic sewing with my machine.


In order to get used to this old beauty I decided I'd just practice with some scrap fabric I had from a project a few years back. Once I began I decided to, at least, try to turn it into something close to real.


 Well, I was able to turn out 2 little cloth bags. When I presented them to my kiddos they jumped for joy & told me the bags would become their "Nature Bags", & I got a lot of thank you's & hugs! 
I was so pleasantly surprised because this was not a beautiful piece of work though I got such a nice response! Talk about motivation to keep sewing!
My next project will be 2 small bags for a birthday party we are attending soon!


7.20.2011

Food: Organic Grilling

Check out the new Food page above where I will be highlighting the delicious (easy & affordable) CREATIONS of my husband.

Did you know that when shopping in the produce section you can find reduced sale items? These usually need to be eaten within the next day or 2 & save you a bunch of money!
Organic veggies on skewers,
chicken, & cute little potatoes. Easy, peasy!

7.18.2011

My next endeavor!

So, my mom gave me this 1960's sewing machine awhile back.
My next endeavor is to learn how to use before the summer is over!

I've researched it online & was able to order a photocopy of the original manual through the Singer website! Yee Haw! Let the sewing begin!


Isn't she cute? :)

7.12.2011

GREEN BEING - a new page!


Everyone knows that we need to be taking better care of the Earth if we want to CREATE a better world for our children and each other. Heck, it's even hip to be green! Here is where I share ways in which my family contributes, as well as, links & important info. you should know! I hope that you, too, will share your knowledge on being a green being.


~The Countertop Composter~
 We got this one as a wedding gift & I love that it looks nice on the counter. You can get them in so many places now. Just do a google search for "countertop compost bin".


Once this fills up we head outside & empty it into our outdoor compost bin.

BALANCE

I find myself so frequently saying, "I need to find balance in my life!" 
So, I explored the idea of balance & what I felt would help me find & feel more balanced.  Being a former runner, dancer & a current yoga teacher, I decided it was time to CREATE the balance I wanted by finding a way to better incorporate these practices into my life.
Here is where I chronicle my journey to balance.

7.12.11 One of my goals this year is to get back into running & run a half-marathon race. So today I began my training! I have 12 weeks to prepare. 
I got my run in during the morning due to high expected temps today.  
haven't run in months, so it was a little less than easy
My thoughts as I ran?
"I run. I run. I run. I don't walk. I'm a runner, I run. hot. breathe. make it to the next mailbox, awesome. see? I run! I am a runner! shoe's untied. don't trip. i run, i don't trip. i run..."
~You get the idea~


I've also found some lovely apps through itunes to help keep me on track.


This one gives you an individual training plan based on your abilities and what you want to train for!

This one lets you to log your runs allowing for distance, time, notes, effort, & more. Also shows you your averages per week & month.


a date 2 create! (Wire wrapped jewelry)

Here we have a picture of the end product from a date 2 create with friends! Unfortunately I don't have the pics of the process so I posted a link below on how to do wire wrapped jewelry. (The woman in the video is not me) 


This was a stone I found by the ocean.  There is no hole at the top to loop the wire through.


7.11.2011

Gratitude - New Page

In an effort to teach gratitude, & become more grateful, I am trying to create rituals of gratitude in our home. Here I plan to share some of these ideas, & simply share what I/we are grateful for in our lives. Please feel free to share your own thoughts & ideas!

7.11.11
One idea we came up with was to chat about what we were grateful for each day at dinner (not a new idea) & then we would use a dry-erase marker, meant for white boards, to write our thoughts on a large window in our living area.  We started by writing We are grateful for: in the middle of the window & then just added to it each day. What we noticed (probably no surprise to you all) is how much our "luck", opportunities, and overall well-being drastically improved! We found ourselves improving our abilities to notice, with even more focus, all of the great things happening around us, no matter how small. 
Being that the window is in our living room, it became a constant reminder of how fortunate we are in our lives, and we would re-read it over & over. What's nice, too, is that it is translucent enough not to block out the light or sights outside of the window.
(As you can see from the pics)
 

The window is now completely full & I am thinking about writing them all down in a journal, wiping the window clean & starting fresh again. :)

7.08.2011

Welcome!

I am so excited to introduce my new blog! What has been an idea in the making for some time is slowly & steadily coming to fruition. a date 2 create came about as I was so lovingly envious of the many beautiful, & creative, blogs out there.  I found myself saying, "If I had the time... If life weren't so crazy right now I'd love to be my creative self more often..." I was caught up in the swift current of my busy life & wishing to be creating more, heck, creating at all! It seemed like there weren't any blogs out there for the full-time working parent, and I set out to create one :)
The idea was that I would pick a date to start creating in some way, shape, or form. I knew that if I didn't pick a date, or schedule it into my life, it wasn't going to happen. What I found was that creativity was available most anywhere - yay! It's just that when life is busy with family & work  you sometimes have to be creative (ha!) in order to see the creative opportunities. 
My hope is that a date 2 create will inspire you to pick a date & start creating the life you've dreamed of (while traveling at the speed of light in your own hectic life).
Most dates are meant to be fairly quick & easy, and not all of them will even be craft related. They just make my creative spirit happy - that's the goal!
The thoughts, projects, & whatever else evolves here, will probably seem quite simple to the avid crafter or creative genius, but that's how it is meant to be - creative opportunities to squeeze in now and then.
Oh, and I won't claim that the ideas here are new, instead, just an attempt at putting creativity into practice through the inspiration of what's around me.

Pallet~Boat~Stage~Creative Work Space

So, I've been eyeing this pallet we have at our house.
{Don't you just love the look of aged wood?!}
I started envisioning painting it & turning into a piece that my kids & their friends could use in a number of different ways (i.e. a boat, a stage, a place to sit & draw...). So I grabbed some cans of paint that we had left over from some house painting we'd done, & I got to work.


Left over paint.  {FYI - The Freshaire paint was a no-voc paint that Home Depot had carried but the company no longer makes it :( }


Some waves to float upon


Here is my attempt at adding some depth/texture 

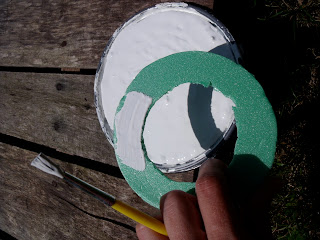
I cut a circle from some styrofoam packaging. Here I am measuring it to be sure it is the size that I want it to be.  I plan to use it to make a stamp to create portholes for this make believe ship.
The porthole stamp is done. I added some tape to the back for easier application.


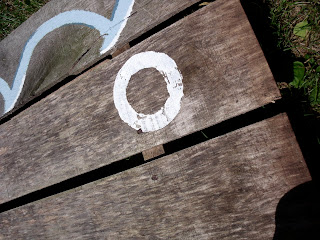
Here I applied some left over, outdoor, porch paint.

Due to the texture of the wood the stamp didn't go on evenly.  I added a little paint by hand (but actually I kind of liked the rough look & didn't get too caught up in making it perfect.)


The boat/stage/creative work space is complete!

We just happened to have an old boat steering wheel that had been given to us at one point.  We didn't attach it b/c the kids like to use it inside the house as well.